
为什么需要高可用? #
规模越大、业务越关键,单点故障带来的代价越难以承受。单台数据库实例,无论硬件多可靠,故障是必然会发生的:磁盘损坏、内存故障、机房断电、误操作,这些都可能让这台唯一的主库瞬间不可用。
如果不使用高可用架构,那么RPO和RTO都无法保证。必须要有自动化的、即时的高可用方案,来将「数据丢失」和「恢复时间」保证在可控范围。
搭建结构 #
这里使用一个简单的高可用方案:
| 角色 | 最少机器数量 | 高可用的说明 |
|---|---|---|
| 基于GTID异步复制的MySQL一主两从 | 至少 3台(每台一个MySQL实例) | mysql1/2/3 分布在不同物理机/可用区,才能真正做到高可用 |
| Orchestrator + 元数据库 | 建议独立 1台(或多台组集群) | Orchestrator自身也建议3节点做Raft集群,避免它自己是单点 |
| ProxySQL | 建议独立 1-2台(多台做负载均衡) | 作为流量入口,也要避免单点故障 |
| 总结 | 最低高可用配置:mysql3台,orch+orch元数据库 1台, ProxySQL1台,至少需要5台。 |
其中:
- 基于GTID异步复制的MySQL一主两从:用GTID简化基于传统位点的主从复制,但是复制本身仍然是异步复制(主库不等从库确认就返回成功),所以RPO较大,没有被GTID解决。可以使用半同步方案来减少这一数据丢失风险。
- Orchestrator 负责拓扑发现、故障检测、候选主库选举和自动切换。
- ProxySQL 提供固定的读写、只读入口,并根据 Orchestrator API 和 MySQL
read_only状态更新路由。
在单机上实现,或者在腾讯云/阿里云的弹性ECS上按小时租,这里我在单机上实现:
| Compose 服务 | 管理地址 | 角色 |
|---|---|---|
| mysql1 | 127.0.0.1:3306 |
master,可写 |
| mysql2 | 127.0.0.1:3307 |
GTID slave 从库,只读 |
| mysql3 | 127.0.0.1:3308 |
GTID slave 从库,只读 |
| orchestrator-db | 127.0.0.1:3309 |
Orchestrator 元数据库 |
| orchestrator | 127.0.0.1:3000 |
拓扑管理、自动故障切换主库 |
| proxysql | 127.0.0.1:6032(管理)/6033(读)/6034(写) |
读写分离和连接路由 |
GTID异步复制的Mysql Replication拓扑 #
二进制安装几个mysql实例:单二进制脚本🔗link
sudo python3 mysql_binary_install.py \
  --archive ~/mysql/Notes-Mysql/Mysql-Installer/mysql-8.0.37-linux-glibc2.28-x86_64.tar.xz \
  --md5sum 4ef87d5f5160a6565e767ec10002ce74 \
  --root-password 'Your@password123' \
  --port 3306 \
  --bind-address 0.0.0.0 \
  --server-id 101 \
  --report-host 127.0.0.1 \
  --report-port 3306

sudo python3 mysql_binary_install.py \
  --archive ~/mysql/Notes-Mysql/Mysql-Installer/mysql-8.0.37-linux-glibc2.28-x86_64.tar.xz \
  --md5sum 4ef87d5f5160a6565e767ec10002ce74 \
  --root-password 'Your@password123' \
  --port 3307 \
  --bind-address 0.0.0.0 \
  --server-id 102 \
  --report-host 127.0.0.1 \
  --report-port 3307 \
  --datadir /var/lib/mysql-3307 \
  --config /etc/my-3307.cnf

sudo python3 mysql_binary_install.py \
  --archive ~/mysql/Notes-Mysql/Mysql-Installer/mysql-8.0.37-linux-glibc2.28-x86_64.tar.xz \
  --md5sum 4ef87d5f5160a6565e767ec10002ce74 \
  --root-password 'Your@password123' \
  --port 3308 \
  --bind-address 0.0.0.0 \
  --server-id 103 \
  --report-host 127.0.0.1 \
  --report-port 3308 \
  --datadir /var/lib/mysql-3308 \
  --config /etc/my-3308.cnf
修改3307和3308上的slave配置:
// etc/my-3307.cnf, etc/my-3308.cnf
[mysqld]
read_only = ON
super_read_only = ON
在主库上添加replication账号:
CREATE USER 'repl'@'%' IDENTIFIED BY 'Your@password123';
GRANT REPLICATION SLAVE ON *.* TO 'repl'@'%';
在从库上进行复制配置
# 开启tls
CHANGE REPLICATION SOURCE TO SOURCE_SSL = 1;

# 设置主库
CHANGE REPLICATION SOURCE TO
  SOURCE_HOST = '127.0.0.1',
  SOURCE_USER = 'repl',
  SOURCE_PASSWORD = 'Your@password123',
  SOURCE_PORT = 3306,
  SOURCE_AUTO_POSITION = 1;

# 作为主从的 从节点
START REPLICA;

#
SHOW REPLICA STATUS\G
此时主从搭建完成,等待主从同步结束,两个slave 3307和3308上面也有了replication的账号。
Orchestrator #
个人还是推荐docker安装,本地部署需要查不少手册,有点累。
安装
wget https://github.com/openark/orchestrator/releases/download/v3.2.6/orchestrator_3.2.6_amd64.deb
dpkg -i ...
dpkg -r orchestrator
安装目录
安装目录:/usr/local/orchestrator

/usr/local/orchestrator/
├── orchestrator                        # 主程序二进制(19MB,2021-07-27)
├── orchestrator-sample.conf.json
├── orchestrator-sample-sqlite.conf.json
└── resources/
    ├── bin/orchestrator-client         # 客户端脚本
    ├── templates/                      # Web UI 模板
    ├── public/                         # 前端 js/css/图片
    ├── metrics/orchestrator-grafana.json
    └── pseudo-gtid/
配置/etc/orchestrator.conf.json
{
  "Debug": false,
  "ListenAddress": ":3000",

  "MySQLOrchestratorHost": "127.0.0.1",
  "MySQLOrchestratorPort": 3306,
  "MySQLOrchestratorDatabase": "orchestrator",
  "MySQLOrchestratorUser": "orch_backend",
  "MySQLOrchestratorPassword": "orch_backend_pass",


  "MySQLTopologyUser": "orch_topo",
  "MySQLTopologyPassword": "orch_topo_pass",

  "InstancePollSeconds": 5,
  "DiscoverByShowSlaveHosts": true,
  "UnseenInstanceForgetHours": 240,

  "RecoveryPeriodBlockSeconds": 3600,
  "RecoverMasterClusterFilters": ["*"],
  "PromotionIgnoreHostnameFilters": [],
}
创建orch元数据库
sudo python3 mysql_binary_install.py \
  --archive ~/mysql/Notes-Mysql/Mysql-Installer/mysql-8.0.37-linux-glibc2.28-x86_64.tar.xz \
  --md5sum 4ef87d5f5160a6565e767ec10002ce74 \
  --root-password 'Your@password123' \
  --port 3309 \
  --bind-address 0.0.0.0 \
  --server-id 104 \
  --report-host 127.0.0.1 \
  --report-port 3309 \
  --basedir /usr/local/mysql \
  --datadir /var/lib/mysql-3309 \
  --config /etc/my-3309.cnf

alias mysql3309='/usr/local/mysql/bin/mysql -uroot -h127.0.0.1 -P3309 -pYour@password123'
在主库上创建mysql用户,通过replication复制到从库上:
CREATE USER 'orch_topo'@'127.0.0.1' IDENTIFIED BY 'orch_topo_pass';
GRANT PROCESS, REPLICATION SLAVE, REPLICATION CLIENT, RELOAD ON *.* TO 'orch_topo'@'127.0.0.1';
GRANT REPLICATION_SLAVE_ADMIN, GROUP_REPLICATION_ADMIN ON *.* TO 'orch_topo'@'127.0.0.1';
在从库上select user, host, plugin from mysql.user;做验证。
在orch元数据库上创建用户
CREATE USER 'orch_backend'@'127.0.0.1' IDENTIFIED BY 'orch_backend_pass';
CREATE DATABASE IF NOT EXISTS orchestrator;
GRANT ALL ON orchestrator.* TO 'orch_backend'@'127.0.0.1';
进行orch发现
curl -s "http://127.0.0.1:3000/api/discover/127.0.0.1/3306"
有:
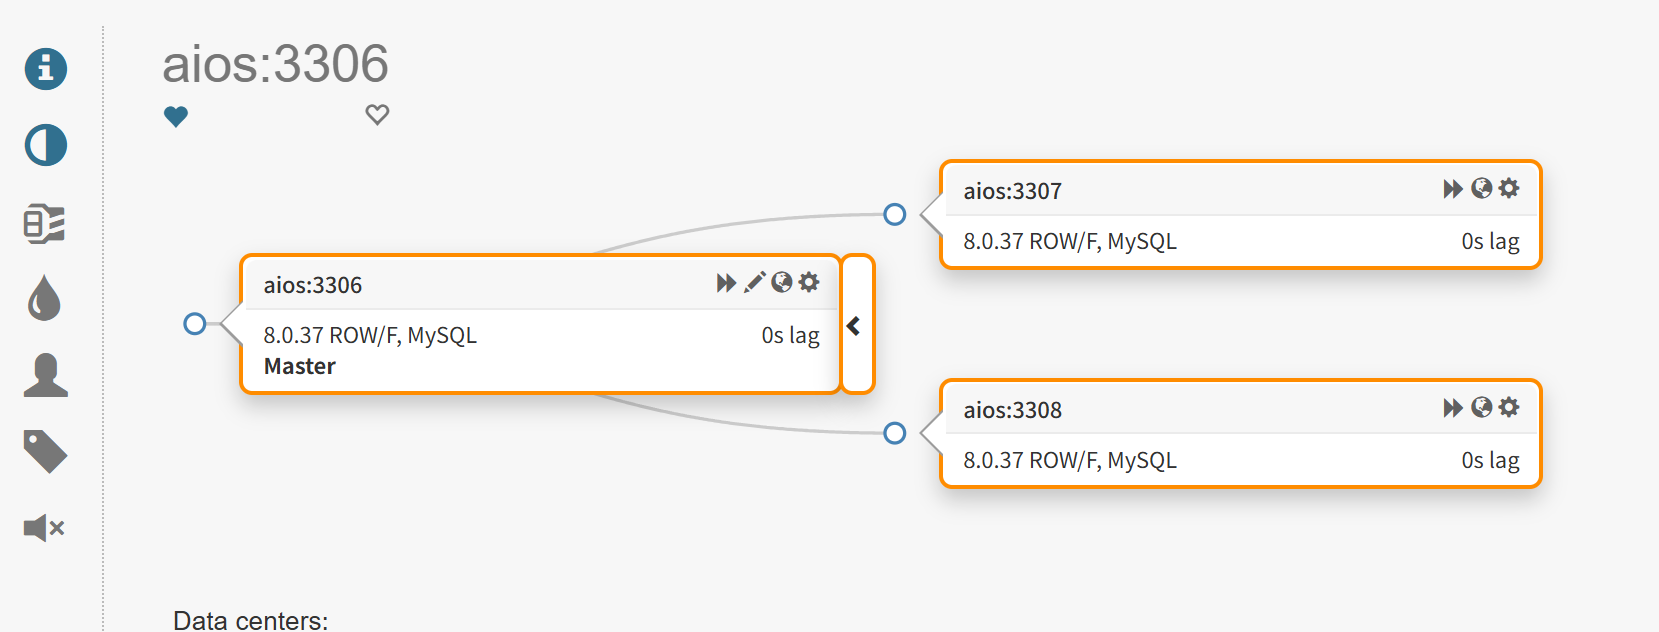
可以手动测试下故障切换
systemctl stop mysqld
停止3306后 3308自动提升为主库,自动切主的时候将新主库的两个read_only修改为false。
mysql> SELECT VARIABLE_NAME, VARIABLE_VALUE
    -> FROM performance_schema.global_variables
    -> WHERE VARIABLE_NAME IN ('read_only', 'super_read_only');
+-----------------+----------------+
| VARIABLE_NAME   | VARIABLE_VALUE |
+-----------------+----------------+
| read_only       | OFF            |
| super_read_only | OFF            |
+-----------------+----------------+
2 rows in set (0.00 sec)

mysql> SHOW global VARIABLES LIKE '%read_only';
+-----------------------+-------+
| Variable_name         | Value |
+-----------------------+-------+
| innodb_read_only      | OFF   |
| read_only             | OFF   |
| super_read_only       | OFF   |
| transaction_read_only | OFF   |
+-----------------------+-------+
4 rows in set (0.01 sec)
proxySQL #
用于分流的工具,提供固定的读写、只读入口,并根据 Orchestrator API 和 MySQL read_only 状态更新路由。
在故障切换的时候,自动切换可写主库,在应用层我们只需要填写两个东西:读写url+用户名密码、只读url+用户名密码。
需要在orchestrator 配置的json中添加钩子:
{
  "PostMasterFailoverProcesses": [
    "curl -fsS -X POST http://proxy-sync:8080/sync >/dev/null 2>&1 || true",
    "echo 'Master failover complete: {failedHost}:{failedPort} -> {successorHost}:{successorPort}' >> /tmp/recovery.log"
  ],
  "PostIntermediateMasterFailoverProcesses": [
    "curl -fsS -X POST http://proxy-sync:8080/sync >/dev/null 2>&1 || true",
    "echo 'Intermediate master failover complete: {failedHost}:{failedPort} -> {successorHost}:{successorPort}' >> /tmp/recovery.log"
  ],
  "PostGracefulTakeoverProcesses": [
    "curl -fsS -X POST http://proxy-sync:8080/sync >/dev/null 2>&1 || true",
    "echo 'Graceful takeover complete: {failedHost}:{failedPort} -> {successorHost}:{successorPort}' >> /tmp/recovery.log"
  ],
}
这块要记录的内容比较多,有时间以后再写。